UI布局 & 适配
1.适配的进化
1.Autoresizing
Autoresizing是苹果早期的界面适配方案,那时苹果的设备还不算多,iPhone 只有 4s 及其之前的产品,都是3.5英寸屏幕;iPad 也只有 iPad1、iPad2,都是9.7英寸。并且当时 iOS 上的应用很少需要适配横屏,所以Autoresizing能够满足绝大部分的适配需求。
xib或者故事板(iOS5)中的6条线:
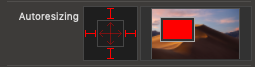
代码中的6个枚举值:
1 | |
这6个枚举值在实际应用时一般都是组合起来使用:
1 | |
通过Autoresizing,你可以方便的设置某个控件相对于其父视图的布局但这也是它的最大缺点:它只能用于设置子视图相对于其父视图的布局,对于与其同级的兄弟视图,或者其他父视图内的子视图之间的位置关系,它能做的很少。
2.AutoLayout
2012年iOS6发布,随之而来的设备是 4.0 英寸的iPhone5,我们需要适配的屏幕尺寸多了一个。为了减少开发者的适配工作量,苹果提供了基于约束的AutoLayout,即自动布局这一适配方案。约束条件控制了各控件之间的位置关系,且不局限于子控件与其父视图之间了,任意两个控件之间都可以设置约束关系。
这是xib中的布局约束:
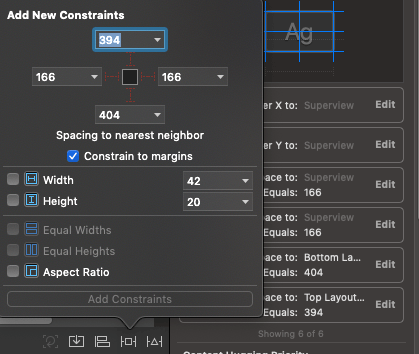
这是代码中的布局约束:
1 | |
- 参数1:attribute
1 | |
- 参数2:relation
1 | |
- 参数3:multiplier
比例或者倍数,最终约束的值 = multiplier * constant。
- 参数4:constant
默认倍数为1时的约束的值。
注意事项:
- 在添加约束之前,须确保控件已经添加到父视图中;
- 控件的 translatesAutoresizingMaskIntoConstraints 必须要设置为NO~
你还可以通过VFL格式创建NSLayoutConstraint,只是比较抽象,就不介绍了。
3.SizeClasses
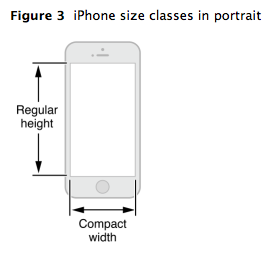
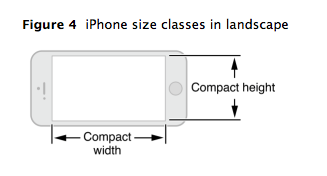
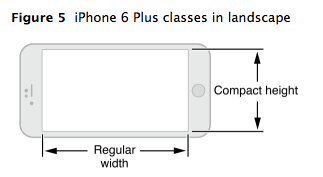
2014年 iOS8 发布,随之而来的设备是4.7英寸的 iphone6 和5.5英寸的 iphone6 Plus。这样我们需要适配的屏幕尺寸又多了两款,适配难度进一步增加。这时苹果提出了SizeClasses概念,这是苹果对诸多设备宽高尺寸的一种抽象,它将设备的尺寸分为三类:
- Compact(紧凑型)
- Regular(宽大型)
- Any(实际上是Compact与Regular的组合)
三种抽象尺寸的组合,可以描述任意类型的设备及其横、竖屏状态、SplitView等。
| 竖屏 | 宽R 高R | 宽C 高R | 宽C 高R | 宽C 高R |
| 横屏 | 宽R 高R | 宽R 高C | 宽C 高C | 宽C 高R |
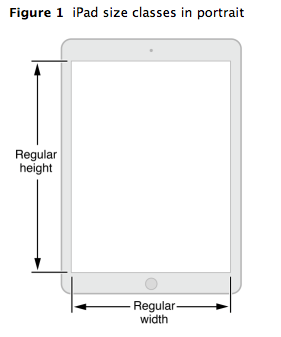
示例1:(wR hR)表示竖屏状态下全屏的iPad:
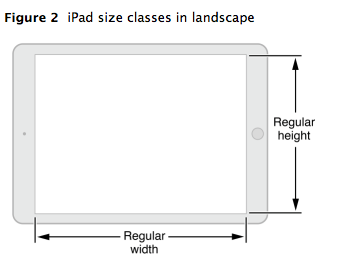
示例2:(wR hR)表示横屏状态下全屏的iPad:
示例3:(wC hR)表示竖屏状态下的iPhone,或者iPad上 1/3 的 splitView:
示例4:(wC hC)表示横屏状态下的非 plus 版iPhone:
示例5:(wR hC)表示横屏状态下的 plus 版iPhone:
需要注意:SizeClasses只是对设备尺寸的抽象,真正的布局还需要开启AutoLayout。
4.Vary For Traits
XIB编辑界面默认是(Any-Any)模式,此时添加的约束在任意机型下的呈现都是相同的,可以点击XIB底部的View as xxx,在Device列表中选择不同的设备,或者切换Orientation选项,查看相同约束在不同情形下的呈现。
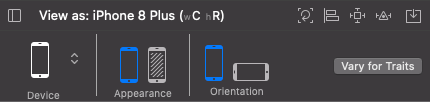
有时我们希望,同一个视图在不同机型、或横、竖屏下,呈现不同的布局。这就要用到 Xcode 8 之后推出的Vary For Traits,它基于SizeClasses进化而来,极大地方便了我们对这些情形的适配。
- 1.先来配置竖屏。
点击底部View as xxx即可打开Vary For Traits功能,在Device列表中选择iPhone 8 plus,Orientation选择竖屏,此时进入(wC hR)模式;
点击右侧Vary For Traits按钮,在弹出的小面板中勾选Width和Height,这样我们就能以(wC hR)模式为基准进行适配了,即适配所有宽度是紧凑、高度是正常的机型。接下来我们所设置的约束,将只适用于68款机型,包括了所有iPhone的竖屏和iPad的SplitView。
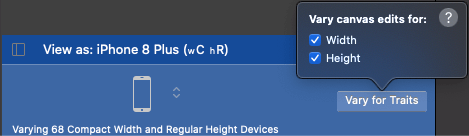
设置好约束后,点击Done Varying就可以完成本次适配了。
- 2.再来适配横屏。
Device依然选择iPhone 8 plus,Orientation选择横屏,点击右侧Vary for Traits,勾选Height,这样就能以(wAny hC)模式为基准进行适配了,即适配所有横屏状态下的iPhone。接下来我们所设置的约束,将只适用于18款机型。
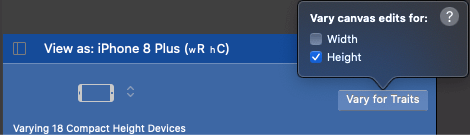
设置好约束后,点击Done Varying就可以完成本次适配了。
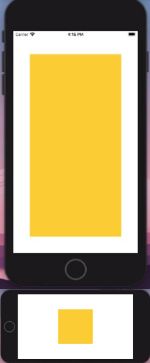
至此,我们就完成了相同视图在竖屏与横屏模式下的不同配置,看下旋转前后的不同布局效果。
2.布局接口
1 | |
系统会在视图需要重新计算其frame时调用此方法,这些情况包括:
- 改变了视图的 frame;
- 更新了视图的约束;
- 改变了视图层级,如新增子视图;
- 屏幕旋转了;
你也可以重写此方法,以便自定义视图及其子视图的布局信息。
此方法由系统自动调用,不建议我们手动调用。真有需要时使用 [view layoutIfNeeded] 来让系统自动触发此方法。
1 | |
告诉布局系统立即更新布局。比如你更新了约束并想立刻开始位移动画时,手动调用此方法即可。
1 | |
将视图标记为需要更新布局,但不会立马进行,而是在下一个 update cycle 中进行。
1 | |
若需要在当前视图上绘制自定义的内容,则重写此方法。
1 | |
将视图标记为需要重绘,其实质是 layer 的重绘,最终会触发-drawRect:方法。
3.约束的属性&接口
1 | |
这是Autoresizing时代的产物,使用 IB 创建视图时,默认为 NO;纯代码添加视图时,默认值为 YES。当需要手动添加和修改约束时,需要将此属性置为 NO。因为视图的 AutoresizingMask 会被转换成对应效果的约束。这样很可能与我们手动添加的其它约束有冲突。此属性设置成 NO 时,AutoresizingMask 就不会变成约束,即当前视图的 AutoresizingMask 失效了。
1 | |
“Constraint-based layout system” 使用此返回值去决定是否需要调用 updateConstraints 作为正常布局过程的一部分。
1 | |
系统更新约束,自定义 view 时可以重写此方法,在其中添加 view 需要的局部 contraints。注意:要在实现在最后调用 [super updateConstraints]。
1 | |
立即触发约束更新,自动更新布局。
1 | |
当有约束需要更新时,调用此方法来标记这些约束需要在未来的某个点更新,系统之后调用 updateConstraints。
4.自动布局的过程
updating constraints -> layout -> display,每一个步骤都依赖于上一步。
- updating constraints
从下向上(from subview to superview),为下一步准备信息。可以调用 setNeedUpdateConstraints 触发此步。constraints 的改变也会触发此步。但是当你自定义视图时,若一些改变可能会影响到布局时,需要自己去调用 updateConstraintsIfNeeded 以通知自动布局更新约束。
- layout
从上向下(from superview to subview),此步主要应用上一步的信息去设置视图的 center 和 bounds。可以通过调用 setNeedsLayout 去触发此步骤,此方法不会立即应用 layout。如果想要系统立即的更新 layout,可以调用 layoutIfNeeded。另外自定义视图时可以重写 layoutSubViews 方法来得到更多的定制化效果。
- display
从上向下(from superview to subview)。此步是把视图渲染到屏幕上,它与你是否使用 Auto layout 无关,通过调用 setNeedsDisplay 触发,系统会调用 UIView 的 drawRect 方法。
5.VC中视图的布局过程
- -loadView
- viewDidLoad
- viewWillAppear
- updateViewConstraints
- viewWillLayoutSubviews
- viewDidLayoutSubviews
- viewDidAppear
- viewWillDisAppear
- viewDidDisAppear
1 | |
注意,这个-updateViewConstraints方法是 UIViewController 中的,不是 UIView 中的-updateConstraints方法。。“view 属于某个 VC”(比如 self.view),当此 view 需要执行updateConstraints时,会调用 VC 的updateViewConstraints,这样就不用你再自定义此 view 并重写其updateConstraints方法了。方法中需要调用其 super 方法。这个方法的默认实现是调用其所有 subview 的 updateConstraints 方法,这样就自上而下的完成了布局。
另外,updateViewConstraints、viewWillLayoutSubviews、viewDidLayoutSubviews 在当前 vc 布局过程中可能会被多次调用,这三个方法在离开当前控制器时也会被调用。
6.小结
除了self.view外,其他视图的实际 frame 要在以下两个方法执行完之后才能确定:
- view 的 layoutSubViews;
- VC 的 viewDidLayoutSubviews;
所以,当我们真的需要 frame 时要在这个两个时间点以后再去获取。这就是 viewDidLoad 里通过setFrame的方式修改原先在xib里拖动的约束代码无效的症结所在。因为 updateViewConstraints 在 viewDidLoad 后执行,会覆盖掉之前的设置的frame,所以无效。
另外需要注意一点:在使用 sb 或者 xib 加载 VC 时,viewDidLoad 中只有 self.view 的 frame 信息是准确的,其他所有的控件的 frame 都是它们在 sb 或 xib 中的原始尺寸,与当前设备可能不符。
相关参考: