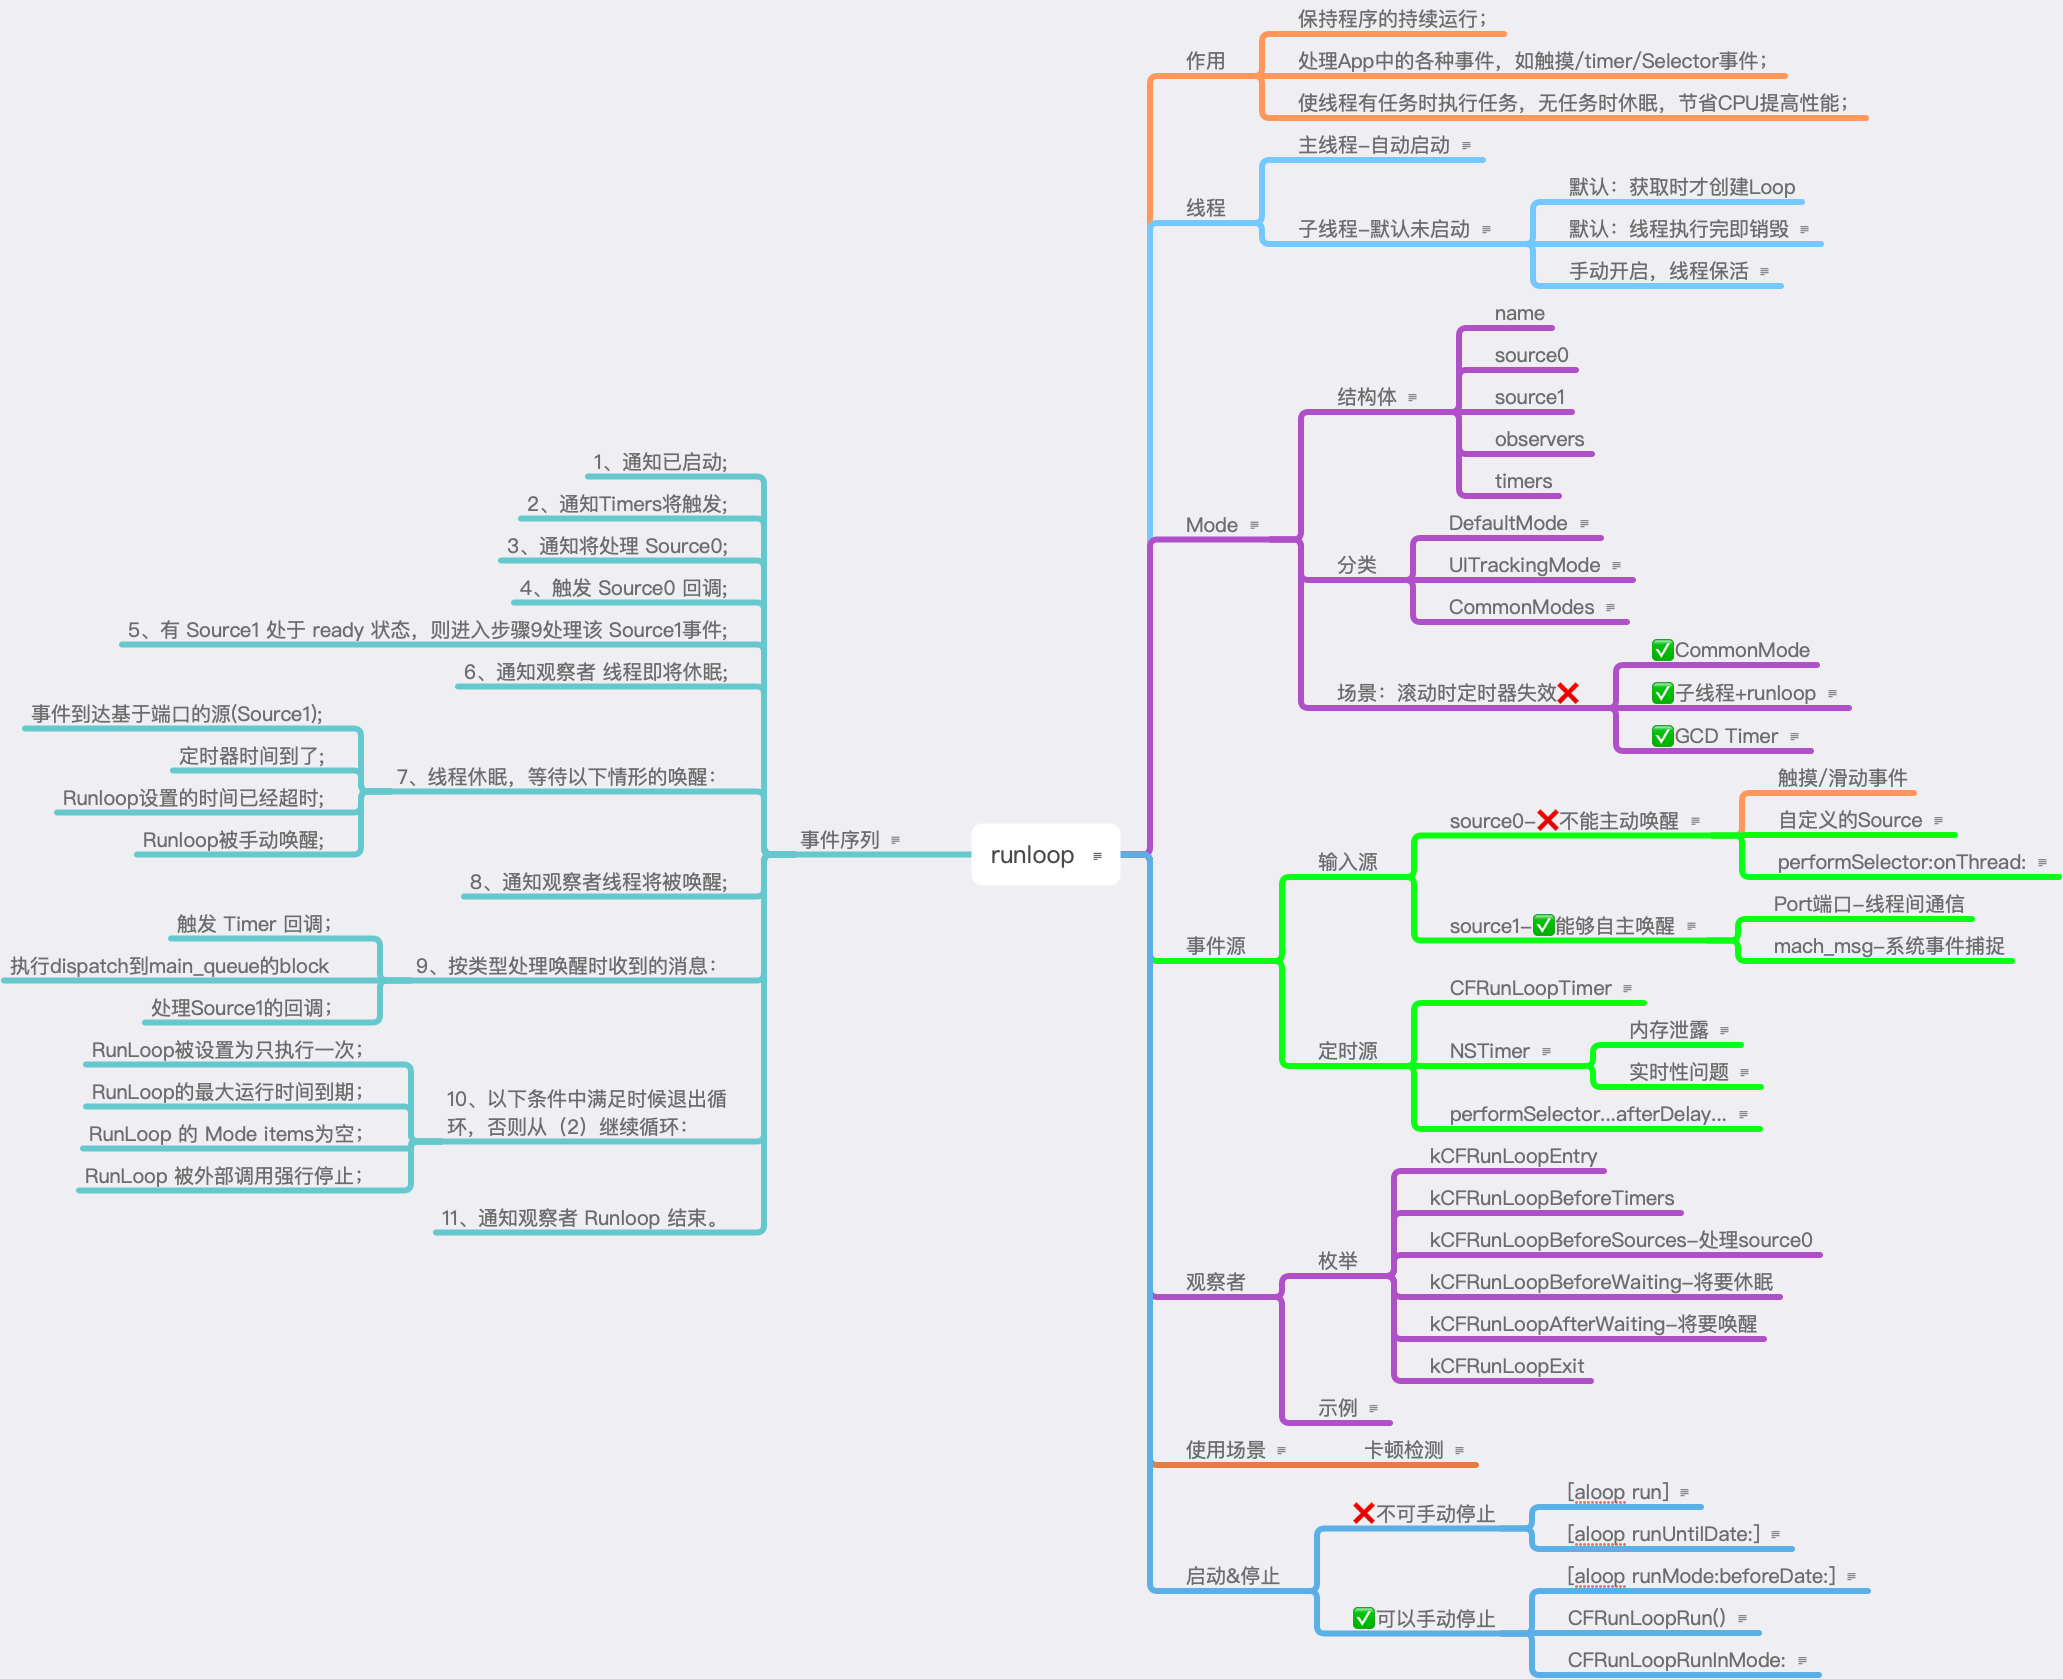
1.Runloop
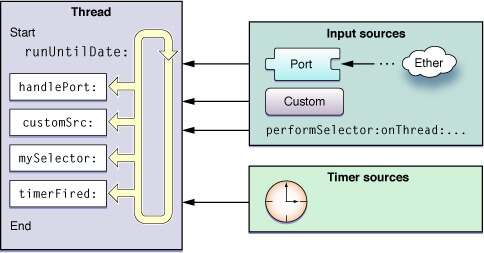
Run loops are part of the fundamental infrastructure associated with threads.A run loop is an event processing loop that you use to schedule work and coordinate the receipt of incoming events.The purpose of a run loop is to keep your thread busy when there is work to do and put your thread to sleep when there is none.
Runloop是处理事件的循环,与线程紧密相关。启动后所在线程相当于一直处在do-while循环中,从而避免没事做被系统自动回收;此时要销毁这个线程必须停止这个 Runloop。
1.作用
保持程序的持续运行;
处理App中的各种事件(如触摸事件、定时器事件、Selector事件);
使线程有任务时执行任务,无任务时休眠,以节省CPU资源,提高程序性能;
2.与线程的关系 每个线程都有相关的 Runloop 对象,Cocoa与CF框架都提供了接口帮助管理线程的Runloop,无须我们显式的创建这些对象。
在程序启动的过程中,系统会自动在主线程上设置并启动了一个 Runloop。具体入口是在 main 文件中的如下代码中:
1
2
3
4
5
6
7
#import "AppDelegate.h" int main(int argc, char * argv[]) {@autoreleasepool {return UIApplicationMain (argc, argv, nil , NSStringFromClass ([AppDelegate class ]));
函数UIApplicationMain()内部为主线程启动了一个runloop。应用能在无任何操作时休眠,监听到输入事件时立马响应,就是因为有这个runloop在一直监听和响应这些事件。
除主线程外,其他线程的runloop默认都是没有开启的,只在第一次获取时才会自动创建,并在线程结束时销毁。因此,这些线程在执行任务时是一条直线类型,从起点到终点,执行完任务后线程就会销毁掉。如果想让子线程保活并继续执行任务,则可自行配置并启动其runloop。
#示例1:
1 2 3 4 5 6 7 8 9 10 11 12 13 14 15 16 17 18 19 20 21 22 23 24 25 26 27 28 @interface ASDFThread : NSThread @end @implementation ASDFThread void )dealloc{NSLog (@"++++THREAD IS DEALLOCED~" );@end #import "ASDFThread.h" @implementation AppDelegate BOOL )application:(UIApplication *)applicationNSDictionary *)launchOptionsself selector:@selector (onHandleEvent) object:nil ];return YES ;void )onHandleEvent{NSLog (@"++++当前线程:%@" ,[NSThread currentThread]);
输出日志:
1
2
++++当前线程:<ASDFThread: 0x600003575e80 >{number = 3 , name = (null )}IS DEALLOCED~
可以看到,自定义的 ASDFThread 线程对象在执行完任务之后,自动销毁了。
如果要线程执行完任务后,仍不销毁以便复用,则可以在当前线程中开启 Runloop:
#示例2:
1
2
3
4
5
6
7
8
- (void )onHandleEvent{NSLog (@"++++当前线程:%@" ,[NSThread currentThread]);CFRunLoopSourceContext context = {0 };CFRunLoopSourceRef source = CFRunLoopSourceCreate (NULL , 0 , &context);CFRunLoopAddSource (CFRunLoopGetCurrent (), source, kCFRunLoopCommonModes);CFRunLoopRun ();
往子线程所在RunLoop中加入一个source并启动Runloop,线程执行完任务后不再自动销毁。
2.RunLoopMode 1 2 3 4 5 6 7 8 9 10 11 struct __CFRunLoopMode {CFStringRef _name;CFMutableSetRef _sources0;CFMutableSetRef _sources1;CFMutableArrayRef _observers;CFMutableArrayRef _timers;
RunLoopMode本质上是个结构体,其中包含了与之对应的事件类型、观察者和计时器等。
Runloop对象可以和若干个mode关联起来。但同一时间 Runloop 只能运行在一种模式下;
运行过程中,只有指定模式下的输入源才会被监听以及收到当前Runloop进度的通知。
需要切换Mode时,要先退出当前RunLoop,再选择一个Mode进入;切换Mode不会导致程序退出。
1.具体模式 1 2 3 NSDefaultRunLoopMode
应用默认的运行模式;
界面跟踪模式,用以在拖动界面时限制其他事件的进入,滑动时主线程的RunLoop会从Default模式切换到Tracking模式;
1 2 3 NSRunLoopCommonModes
这是个可配置的模式集合而非一个真正的模式,默认包括了Default和EventTracking模式。将输入源与该模式关联,实质是将输入源与该组中的每个模式进行了关联。
2.场景:定时器失效 通过scheduled方式创建的Timer默认使用DefaultMode,而拖拽滚动 Scrollview 时 Runloop 处于TrackingMode。由于 Runloop 一次只能运行在一种 Mode 下,所以滚动过程中主线程Runloop无法处理注册在其DefaultMode下的定时器事件,因此定时器也就不会触发。
解决方案:
方案1: CommonMode 将定时器标记为common模式。
思路:定时器默认被加入到当前线程Runloop的DefaultMode中,被标记为common后会自动与common模式中的Tracking模式进行关联。而滑动时Runloop处在Tracking模式下,所以计时器事件能正常响应。
1 2 3 4 5 6 NSTimer *aTimer = [NSTimer scheduledTimerWithTimeInterval:1 self @selector (repeat:)nil true ];NSRunLoop currentRunLoop] addTimer:aTimer forMode:NSRunLoopCommonModes ];
方案2: 子线程 将定时器放入子线程中并开启此线程的RunLoop:
思路:滑动操作发生在主线程,定时器所在的线程是子线程,所以两者互不影响。
1 2 3 4 5 6 7 dispatch_async (dispatch_get_global_queue (0 , 0 ), ^{scheduledTimerWithTimeInterval :1 target :self selector :@selector (aSelector :)userInfo :nil repeats :true ];
需要注意的是,子线程中使用定时器,一定要主动开启子线程的RunLoop,否则定时器不会触发。
方案3: GCD timer 使用GCD提供的定时器API:
1 2 3 4 5 6 7 8 9 10 11 12 13 14 15 16 17 18 19 20 21 22 23 24 25 26 #import "GCDTimerTest.h" @interface GCDTimerTest ()@property (nonatomic , strong ) dispatch_queue_t seriaqueue;@property (nonatomic , strong ) dispatch_source_t timer;@end @implementation GCDTimerTest void )gcd_timer{"xx" , DISPATCH_QUEUE_SERIAL);weak typeof (self ) wself = self ;dispatch_async (_seriaqueue, ^{strong typeof (wself) sself = wself;NSLog (@"+++runloop before timer:%@" ,[NSRunLoop currentRunLoop]);0 , 0 , sself.seriaqueue);1 * NSEC_PER_SEC , 0 * NSEC_PER_SEC );NSLog (@"++++执行计时任务" );NSLog (@"+++runloop after timer:%@" ,[NSRunLoop currentRunLoop]);@end
GCD定时器不是RunLoop的源,不受Mode切换的影响,可参考#3.2定时源-特殊定时器章节的解析。
3.事件来源 Runloop中有了事件源才会有事做,才不会退出循环。事件源分两大类:输入源和定时源。
1.输入源 输入源事件分为source0和source1两种:
source0:需要手动唤醒runloop,如触摸、滑动事件、performSelector:onThread:;
source1:具备唤醒runloop的能力,如基于Port的线程间通信、系统事件捕捉(mach_msg);
1.自定义的输入源 Source0类型,它并不能主动触发事件。使用时要先调用CFRunLoopSourceSignal(),将其标记为待处理。然后看当前Runloop是否在休眠中,如果是则手动调用CFRunLoopWakeUp()来唤醒RunLoop,让其处理这个事件。
#示例:
1 2 3 4 5 6 7 8 9 10 11 12 13 14 15 16 17 18 19 20 21 22 23 24 25 26 27 28 29 30 31 32 33 34 35 36 37 38 39 40 41 42 43 44 45 46 47 static void sourcePerformor(void * info ) NSLog(@"处理自定义输入源事件" ) ;_async(dispatch_get_global_queue (0, 0) , ^{NSLog(@"开启线程......." ) ;CFRunLoopGetCurrent() ;"information" ;CFRunLoopSourceCreate(NULL, 0, &mContext ) ;CFRunLoopAddSource(_mRunLoopRef , _mSourceRef , kCFRunLoopDefaultMode ) ;CFRunLoopRunInMode(kCFRunLoopDefaultMode , 10000, YES) ;NSLog(@"线程结束......." ) ;_after(dispatch_time (DISPATCH_TIME_NOW, (int64_t ) (2 * NSEC_PER_SEC)),_get_main_queue() , ^{if (CFRunLoopIsWaiting(_mRunLoopRef ) ) {NSLog(@"RunLoop正在等待事件输入+++" ) ;CFRunLoopSourceSignal(_mSourceRef ) ; CFRunLoopWakeUp(_mRunLoopRef ) ; else {NSLog(@"RunLoop正在处理事件+++" ) ;CFRunLoopSourceSignal(_mSourceRef ) ;
执行后,输出日志:
1 2 3 4 00 :32 :21 .497879 +0800 开启线程.......00 :32 :24 .663180 +0800 RunLoop正在等待事件输入+++00 :32 :24 .663498 +0800 处理自定义输入源事件00 :32 :24 .663881 +0800 线程结束.......
Source0类型,是 Cocoa 提供的一种自定义的源,允许你在任何线程上执行一个selector。下面列举了NSObject分类中定义的三种performSelector方法:
1 2 3 4 5 6 7 8 9 10 11 12 13 14 15 16 17 18 19 20 21 22 23 24 25 26 27 28 @interface NSObject (NSThreadPerformAdditions)(void) performSelectorOnMainThread:(SEL) aSelector (id) arg (BOOL) wait (NSArray<NSString *> *) array;(void) performSelectorOnMainThread:(SEL) aSelector (id) arg (BOOL) wait;(void) performSelector:(SEL) aSelector (NSThread *) thr (id) arg (BOOL) wait (NSArray<NSString *> *) array;(void) performSelector:(SEL) aSelector (NSThread *) thr (id) arg (BOOL) wait;(void) performSelectorInBackground:(SEL) aSelector (id) arg;
参数说明:
OnMainThread 是在主线程上执行任务;onThread 是在你指定的线程中执行任务,可以是主线程也可以是子线程;InBackground 则是在由系统自动分配的一个子线程中执行任务;withObject 是 selector 方法的参数;waitUntilDone 表示 performSelector 所处的线程是否等 selector 中的任务执行完再继续执行下一行;
#示例:
1 2 3 4 5 6 7 8 9 10 11 12 13 14 15 16 17 18 19 20 21 22 23 24 25 26 27 28 29 30 31 32 33 34 35 36 37 38 39 @interface ASDFThreadHelper : NSObject NSThread *)getThread;void )finish;instancetype )initWithName:(NSString *)name;@end @interface ASDFThreadHelper ()@property (nonatomic , strong ) NSThread *thread;@end @implementation ASDFThreadHelper instancetype )initWithName:(NSString *)name{if (self = [super init]) {NSThread alloc] initWithTarget:self selector:@selector (onThreadInit:) object:nil ];return self ;NSThread *)getThread{return _thread;void )onThreadInit:(id )obj{CFRunLoopRun ();void )start{void )finish{CFRunLoopStop (CFRunLoopGetCurrent ());@end
1 2 3 4 5 6 7 8 9 10 11 12 13 14 15 16 17 18 19 20 21 22 23 24 25 26 @interface AppDelegate ()@property (nonatomic , strong ) ASDFThreadHelper *threadHelper;@end @implementation AppDelegate BOOL )application:(UIApplication *)applicationNSDictionary *)launchOptionsNSLog (@"+++before:%ld" ,(long )CFGetRetainCount ((__bridge CFTypeRef )(self )));@"asdf" ];self performSelector:@selector (onSelector:)nil waitUntilDone:YES ];NSLog (@"+++after:%ld" ,(long )CFGetRetainCount ((__bridge CFTypeRef )(self )));return YES ;void )onSelector:(id )obj{NSLog (@"+++excute:%ld,thread:%@," ,long )CFGetRetainCount ((__bridge CFTypeRef )(self )),[NSThread currentThread]);
1 2 3 +++before :1 2 ,thread:<NSThread: 0x600001850c40 >{number = 3 , name = asdf},after :1
从日志来看:
selector 会在我们指定的子线程中执行任务;
如果 waitUntilDone=YES,执行到 [self perform..onThread..] 时,主线程会等待 selector 执行完之后才继续执行下一行;
给 selector 指定的线程一定要有效,不能是已经退出的,所以我们需要在工具类中将子线程中的 runloop 启动起来;
3.基于端口的输入源 Source1类型,能主动唤醒线程的RunLoop。
内核中进程间的通信通过在两个端口之间传递消息来实现,Source1 监听的正是这些端口。你也可以手动创建端口,以实现不同线程间的通信。
#示例:
1 2 3 4 5 6 7 8 9 10 11 12 13 14 15 16 17 18 19 20 21 22 23 24 25 26 27 28 29 30 31 32 33 34 35 36 37 38 39 40 41 42 43 44 45 46 47 48 49 50 51 52 - (void)runloopPortTestNSPort * PORT1 = [NSMachPort new];NSPort * PORT2 = [NSMachPort port];NSLog (@"\n PORT1:%@ \n PORT2:%@" ,PORT1 , PORT2 );PORT1 .delegate = self ;PORT2 .delegate = self ;NSRunLoop currentRunLoop] addPort:PORT1 forMode:NSDefaultRunLoopMode ];0 , 0 ), ^ {NSRunLoop currentRunLoop] addPort:PORT2 forMode:NSDefaultRunLoopMode ];NSRunLoop currentRunLoop] runMode:NSDefaultRunLoopMode beforeDate:[NSDate distantFuture]];NSString * STR = @"III" ;NSData * data = [STR dataUsingEncoding:NSUTF8StringEncoding ];NSMutableArray * array = [NSMutableArray arrayWithArray:@[PORT1 ,data]];DISPATCH_TIME_NOW , (int64_t)(2 * NSEC_PER_SEC )), ^ {PORT2 sendBeforeDate:[NSDate date] msgid:101 components:array from:PORT1 reserved:0 ];- NSPortDelegate - (void)handlePortMessage:(NSMessagePort * )message{NSUInteger msgId = [[message valueForKeyPath:@"msgid" ] integerValue];NSPort * localPort = [message valueForKeyPath:@"localPort" ];NSPort * remotePort = [message valueForKeyPath:@"remotePort" ];NSLog (@"\n 执行端口代理回调:\n 端口ID = %lu \n localPort:%@ \n remotePort:%@" ,(unsigned long)msgId, localPort, remotePort);if (101 == msgId){NSDate date] msgid:102 components:nil from:localPort reserved:0 ];else if (102 == msgId){
输出日志:
1 2 3 4 5 6 7 8 9 10 11 12 13 19 :30:24.335 0 x600000549d70 >0 x600000340370 >19 :30:26.337 101 0 x600000340370 >0 x600000549d70 >19 :30:26.337 102 0 x600000549d70 >0 x600000340370 >
示例中两个线程间互相发送了一条消息。
1 2 3 4 5 - (BOOL) sendBeforeDate:(NSDate *) limitDate(NSUInteger) msgID(NSMutableArray *) components(NSPort *) receivePort(NSUInteger) headerSpaceReserved;
上面方法中,参数components数组中只能传NSPort、NSData类型的数据,所以除了NSPort对象外,其他数据需要先转成NSData类型。
1 2 3 4 5 6 7 8 @protocol NSPortDelegate <NSObject>@optional handlePortMessage :(NSPortMessage *)message;@end
消息回调之后,通过上面的代理接收,其中的 NSMessagePort 类型只能用 KVC 的方式取值。
2.定时源 定时器的作用是:在预设的时间点或重复的时间间隔,触发某个操作。
1.CFRunLoopTimer 这是Core Foundation框架中的使用的定时器,使用方式如下面的示例:
1 2 3 4 5 6 7 8 9 10 11 12 13 14 15 16 17 void onScheduleTimer(){NSLog (@"+++++" );void )runloop_timer{CFRunLoopRef runLoop = CFRunLoopGetCurrent ();CFRunLoopTimerContext context = {0 , NULL , NULL , NULL , NULL };CFRunLoopTimerRef aTimerRef = CFRunLoopTimerCreate (1 , 1 , 0 , 0 ,CFRunLoopAddTimer (runLoop, aTimerRef, kCFRunLoopCommonModes);
2.NSTimer 这是Cocoa框架中经常使用都的的定时器,其创建方式有以下几种:
1 2 3 4 5 6 7 8 9 10 11 12 13 14 + (NSTimer *)timerWithTimeInterval:(NSTimeInterval )ti id )aTarget selector:(SEL)aSelector userInfo:(id )userInfo repeats:(BOOL )yesOrNo;NSTimer *)timerWithTimeInterval:(NSTimeInterval )interval BOOL )repeats block:(void (^)(NSTimer *timer))block;NSTimer *)timerWithTimeInterval:(NSTimeInterval )ti NSInvocation *)invocation repeats:(BOOL )yesOrNo;instancetype )initWithFireDate:(NSDate *)date NSTimeInterval )interval repeats:(BOOL )repeats block:(void (^)(NSTimer *timer))block;instancetype )initWithFireDate:(NSDate *)date NSTimeInterval )ti target:(id )t selector:(SEL)s userInfo:(nullable id )ui repeats:(BOOL )rep;
这五种方式创建的NSTimer需通过”[[NSRunLoop currentRunLoop] addTimer:forMode:]”手动加入到 Runloop 中并指定模式才能正常开始。
1 2 3 4 5 6 7 8 9 10 + (NSTimer *)scheduledTimerWithTimeInterval:(NSTimeInterval )tiid )aTarget selector:(SEL)aSelector userInfo:(id )userInfo repeats:(BOOL )yesOrNo;NSTimer *)scheduledTimerWithTimeInterval:(NSTimeInterval )intervalBOOL )repeats void (^)(NSTimer *timer))block;NSTimer *)scheduledTimerWithTimeInterval:(NSTimeInterval )ti NSInvocation *)invocation BOOL )yesOrNo;
以上三种方式会自动创建一个NSTimer对象并以DefaultMode加入到 Runloop 中。
NSTimer从本质上来说,就是一个CFRunLoopTimerRef。
#示例:
1 2 3 4 5 6 7 8 9 10 11 12 13 14 15 16 17 18 19 - (void )viewDidLoad {"disafsdfa" , DISPATCH_QUEUE_SERIAL);self nstimer];void )nstimer{dispatch_async (_seriaqueue, ^{NSLog (@"+++runloop before timer:%@" ,[NSRunLoop currentRunLoop]);NSTimer scheduledTimerWithTimeInterval:2 repeats:NO block:^(NSTimer * _Nonnull timer) {NSLog (@"++++执行定时任务" );CFRunLoopStop (CFRunLoopGetCurrent ());NSLog (@"+++runloop after timer:%@" ,[NSRunLoop currentRunLoop]);CFRunLoopRun ();NSLog (@"+++runloop exit:%@" ,[NSRunLoop currentRunLoop]);
日志(有删减,保留了主要内容):
1 2 3 4 5 6 7 8 9 10 11 12 13 14 15 16 17 18 19 20 21 22 23 24 25 26 27 28 29 30 31 32 33 34 35 36 37 38 39 0x600002f88500 >{0x600001ddc7b0 [0x10388eb48 ]>{type = mutable set , count
只看日志中“timers =”部分,定时器开始后,其所在的runloop中多出了一个CFRunLoopTimer对象。就是说NSTimer的底层是由CFRunLoopTimer来实现的。
1.内存泄露 在页面中启动了NSTimer,离开界面前如果NSTimer没执行完,则界面无法释放,即使把这个NSTimer对象置为nil,或者使用weakSelf。这是因为NSTimer对象会强引用它的Target。
1 2 3 4 5 6 7 8 9 10 11 12 13 14 15 16 17 18 19 20 21 22 @interface DKTimerController ()
1.invalidate 方法1:在适当的时机将NSTimer置为invalidate。
1 2 3 - (void)viewWillDisappear:(BOOL)animated{
2.block timer 方法2:使用 weakself+block timer
1 2 3 4 5 6 7 8 9 10 11 12 13 - (void)viewDidLoad{
3.NSProxy 方法3:使用NSProxy
1 2 3 4 5 6 7 8 9 10 11 12 13 14 15 16 17 18 19 20 21 @interface DKTimerProxy : NSProxy
1 2 3 4 5 6 7 8 9 10 11 12 13 14 15 16 17 18 19 20 21 22 23 24 #import "DKTimerProxy.h"
VC强引用了timer,而timer将proxy作为Target从而强引用proxy;VC中创建局部变量proxy,它弱引用了VC;这样就打破了强引用循环。proxy中调用timer的selector时查无对应的实现,会走消息转发流程,将方法的调用转发给VC。
2.实时性 定时器可以产生基于时间的通知,但它并不是一种real-time的机制。
如果子线程的 Runloop 根本没有运行,那么定时器也不会触发;
定时器也和 Runloop 的 mode 相关。如果定时器所在的模式当前未被 Runloop 监视,那么定时器将不会触发;
重复类型的定时器,添加到 RunLoop 后,RunLoop 会为其重复的时间点注册好事件。比如t,t + 5,t + 10。。如果某个时间点被错过了,例如执行了一个很长的任务,则那个时间点的回调也会跳过去,不会延后执行。
#示例:
1 2 3 4 5 6 7 8 9 10 11 12 13 14 15 16 17 18 19 20 21 22 23 24 25 26 27 28 #import "Timer-Runloop.h" @implementation Timer_Runloop void )scheduleTimerNSTimer scheduledTimerWithTimeInterval:1 self @selector (onScheduleTimer)nil repeats:YES ];self performSelector:@selector (onMassTasks) withObject:nil afterDelay:3 ];void )onScheduleTimerNSLog (@"++++1秒重复定时执行++++" );void )onMassTasksNSLog (@"+++开始处理复杂运算+++" );for (int i = 0 ; i< 0xffffffff ; i++){NSLog (@"++++++复杂运算完成++++++" );@end
调用之后输入日志:
1 2 3 4 5 6 7 8 9 20 :30 :10 .952360 ++++1 秒重复定时执行++++20 :30 :11 .952263 ++++1 秒重复定时执行++++20 :30 :12 .952284 ++++1 秒重复定时执行++++20 :30 :12 .952628 +++开始处理复杂运算+++20 :30 :24 .104517 ++++++复杂运算完成++++++20 :30 :24 .104825 ++++1 秒重复定时执行++++20 :30 :24 .952362 ++++1 秒重复定时执行++++20 :30 :25 .951624 ++++1 秒重复定时执行++++20 :30 :26 .951637 ++++1 秒重复定时执行++++
从日志可以看到:当线程空闲的时候定时器的消息触发还是比较准确的,但是在30分12秒开始线程一直忙着做大量运算,直到30分24秒该运算才结束,这时候定时器回调才触发。这个线程繁忙的过程超过了一个周期,但是定时器并没有连着触发两次消息,而是只触发了一次。也就是说繁忙期间的几次回调都跳过了,繁忙过后立刻执行了一次回调,之后又正常1秒执行一次回调。
3.特殊的定时器 1.delay NSTimer是最常见的定时器,除此之外NSObject的分类中还定义了一些特殊的定时器:
1 2 3 4 5 6 7 8 9 10 11 12 13 14 15 16 17 18 19 20 @interface NSObject (NSDelayedPerforming)(void) performSelector:(SEL) aSelector (id) anArgument (NSTimeInterval) delay (NSArray<NSRunLoopMode> *) modes;(void) performSelector:(SEL) aSelector (id) anArgument (NSTimeInterval) delay;(void) cancelPreviousPerformRequestsWithTarget:(id) aTarget (SEL) aSelector (nullable id) anArgument;(void) cancelPreviousPerformRequestsWithTarget:(id) aTarget;
#示例:
1 2 3 4 5 6 7 8 9 10 11 12 13 14 15 16 17 -(void )onSelector:(id )obj{NSLog (@"+++thread:%@,++runloop:%@" ,[NSThread currentThread],[NSRunLoop currentRunLoop]);BOOL )application:(UIApplication *)applicationNSDictionary *)launchOptionsdispatch_async (dispatch_get_global_queue(0 , 0 ), ^{NSLog (@"+++runloop:%@" ,[NSRunLoop currentRunLoop]);self performSelector:@selector (onSelector:) withObject:nil afterDelay:1 ];NSLog (@"++++check timers:%@" ,[NSRunLoop currentRunLoop]);CFRunLoopRun ();return YES ;
输出日志(有删减,保留了主要内容):
1 2 3 4 5 6 7 8 9 10 11 12 13 14 15 16 17 18 19 20 21 22 23 24 25 26 27 28 29 30 31 32 33 34 35 36 37 38 39 40 41 42 43 44 45 46 47 48 0x60000222c700 >{0x600001062dc0 >{type = mutable set , count
日志显示,在调用perform..afterDelay后,子线程 runloop 的 CFRunLoopMode 的timers数组中有了一个CFRunLoopTimer对象!它就是系统为延时操作创建的一个定时器;延时操作完成之后,此定时器对象又自动从timers数组中移除。
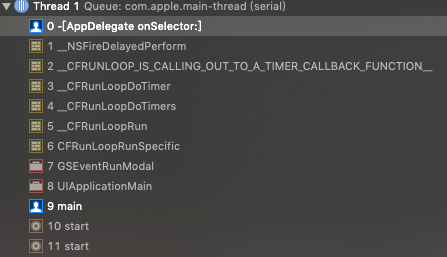
同时,如果在调用-onSelector:时打断点,可得到如下的堆栈信息:
从堆栈上也可以看到,延时操作的本质是运行时在当前线程的 runloop 中添加了一个“定时源” ~
需要注意的是:在子线程中使用这种延时执行方法时,如果不主动启动子线程的 runloop,那么 selector 是不会执行的 。这也就是前面提到的“如果子线程的 Runloop 根本没有运行,那么定时器也不会触发”,实际的开发中一定要注意这一点。
另外:这两个方法都只是将selector的调用延迟某个时间长度,并不影响调用方法时所处的线程,即在A线程调用这两个performSelector,延迟后的selector还是在A线程中执行。
2.GCD定时器 首先要说明的是,GCD的定时器与上面三种不同,它不是runloop的源!
1 2 3 4 5 6 7 8 9 10 11 12 13 14 15 16 17 18 19 20 21 22 23 24 25 26 #import "GCDTimerTest.h" @interface GCDTimerTest ()@property (nonatomic , strong ) dispatch_queue_t seriaqueue;@property (nonatomic , strong ) dispatch_source_t timer;@end @implementation GCDTimerTest void )gcd_timer{"xx" , DISPATCH_QUEUE_SERIAL);weak typeof (self ) wself = self ;dispatch_async (_seriaqueue, ^{strong typeof (wself) sself = wself;NSLog (@"+++runloop before timer:%@" ,[NSRunLoop currentRunLoop]);0 , 0 , sself.seriaqueue);1 * NSEC_PER_SEC , 0 * NSEC_PER_SEC );NSLog (@"++++执行计时任务" );NSLog (@"+++runloop after timer:%@" ,[NSRunLoop currentRunLoop]);@end
日志:
1 2 3 4 5 6 7 8 9 10 11 12 13 14 15 16 17 18 19 20 21 22 23 24 25 +++runloop before timer:<CFRunLoopnull ),0x600001b71dd0 >{2 : <CFRunLoopMode 0x600002e2a8a0 >{name = kCFRunLoopDefaultMode, 0x600003b25900 (not fired), 0x5f03 , null ),null ),null ),null ),after timer:<CFRunLoop 0x600002928200 {0x600001b71dd0 2 : <CFRunLoopMode 0x600002e2a8a0 >{name = kCFRunLoopDefaultMode,null ),null ),null ),null ),
日志中可以看到,开启GCD定时器之后,当前runloop的timers中也并未增加新的定时源~
所以,GCD定时器并不是由CFRunLoopTimer实现的,也不需要加入到runloopMode中,不受runloop模式切换的影响 ,甚至在切换到后台时,它依然能正常运行。
4.观察者 Runloop在处理输入事件的同时,在其运行的特定阶段还会触发通知。我们可以使用 CF 的方法,注册观察者来接收通知并在某个特定时期处理一些事情。
Runloop可以被观察的状态包括以下阶段:
1 2 3 4 5 6 7 8 9 10 /* Run Loop Observer Activities */ 1 UL << 0 ), // runloop进入时;1 UL << 1 ), // 将要处理Timer时;1 UL << 2 ), // 将要处理Source0时;1 UL << 5 ), // 将要进入睡眠时;1 UL << 6 ), // 将要被唤醒时;1 UL << 7 ), // runloop即将退出时;0 x0FFFFFFFU
#示例:
1 2 3 4 5 6 7 8 9 10 11 12 13 14 15 16 17 18 19 20 21 22 23 24 25 26 27 28 29 30 31 32 33 34 35 36 37 38 39 40 41 42 43 44 45 46 47 48 49 50 51 52 53 54 55 56 57 58 59 60 61 62 63 64 65 66 67 68 69 70 71 72 73 74 75 76 77 78 79 80 81 82 83 84 85 86 87 88 89 - (void )runloopReturnTestdispatch_async (dispatch_get_global_queue(0 , 0 ), ^{NSRunLoop *mRunloop = [NSRunLoop currentRunLoop];CFRunLoopObserverRef observer = CFRunLoopObserverCreateWithHandler (YES , 0 ,CFRunLoopObserverRef observer, CFRunLoopActivity activity){switch (activity) {case kCFRunLoopEntry:NSLog (@"observer: kCFRunLoopEntry..." );break ;case kCFRunLoopBeforeTimers:NSLog (@"observer: kCFRunLoopBeforeTimers..." );break ;case kCFRunLoopBeforeSources:NSLog (@"observer: kCFRunLoopBeforeSources..." );break ;case kCFRunLoopBeforeWaiting:NSLog (@"observer: kCFRunLoopBeforeWaiting..." );break ;case kCFRunLoopAfterWaiting:NSLog (@"observer: kCFRunLoopAfterWaiting..." );break ;case kCFRunLoopExit:NSLog (@"observer: kCFRunLoopExit..." );break ;default :break ;if (observer){CFRunLoopRef cfLoop = [mRunloop getCFRunLoop];CFRunLoopAddObserver (cfLoop, observer, kCFRunLoopDefaultMode);NSLog (@"This thread starting......." );NSTimer *timer = [NSTimer timerWithTimeInterval:5 self @selector (onHandleTask:)nil NO ];NSDefaultRunLoopMode ];CFRunLoopRunInMode (kCFRunLoopDefaultMode, 100 , YES );switch (result) {case kCFRunLoopRunFinished:NSLog (@"kCFRunLoopRunFinished" );break ;case kCFRunLoopRunStopped:NSLog (@"kCFRunLoopRunStopped" );break ;case kCFRunLoopRunTimedOut:NSLog (@"kCFRunLoopRunTimedOut" );break ;case kCFRunLoopRunHandledSource:NSLog (@"kCFRunLoopRunHandledSource" );break ;default :break ;NSLog (@"This thread end......." );void )onHandleTask:(NSTimer *)timer{NSLog (@"timer Fired..." );
上面的示例中,先往当前子线程的 runloop 中添加了一个观察者,监听并打印各个阶段的状态;随后往 runloop 中添加了一个定时器。执行到CFRunLoopRunInMode时,程序卡在这一行。5秒后计时器触发,计时器invalidate后,Runloop 中没有了任何事件源,所以退出并返回了result值,程序继续向下运行,输出日志如下:
1 2 3 4 5 6 7 8 9 10 23 :48 :10 .831 This thread starting.......23 :48 :10 .831 observer: kCFRunLoopEntry...23 :48 :10 .832 observer: kCFRunLoopBeforeTimers...23 :48 :10 .832 observer: kCFRunLoopBeforeSources...23 :48 :10 .833 observer: kCFRunLoopBeforeWaiting...23 :48 :15 .834 observer: kCFRunLoopAfterWaiting...23 :48 :15 .835 timer Fired...23 :48 :15 .835 observer: kCFRunLoopExit...23 :48 :15 .836 kCFRunLoopRunFinished23 :48 :15 .836 This thread end.......
5.事件序列 1、通知观察者 Runloop 已经启动;
2、通知观察者 Timers 即将触发;
3、通知观察者 将要处理 Source0;
4、触发 Source0 回调;
5、如果有 Source1 处于 ready 状态,直接进入步骤9处理该 Source1事件;
6、通知观察者 线程即将休眠;
7、线程休眠 等待以下情形的唤醒:
某一事件到达基于端口的源(Source1);
定时器时间到了;
Runloop 设置的时间已经超时;
Runloop 被手动唤醒;
8、通知观察者线程将被唤醒;
9、处理唤醒时收到的消息:
如果消息是Timer类型,则触发该Timer的回调;
如果消息是 dispatch 到 main_ queue 的block,执行block;
如果消息是Source1类型,则处理Source1回调;
10、以下条件中满足时候退出循环,否则从(2)继续循环:
事件处理完毕,且启动 RunLoop 时参数设置为一次性执行;
启动 RunLoop 时设置的最大运行时间到期;
RunLoop 被外部调用强行停止;
启动 RunLoop 的 mode items为空;
11、通知观察者 Runloop 结束。
上面逻辑对应的 CFRunLoop.c源码 如下:
1 2 3 4 5 6 7 8 9 10 11 12 13 14 15 16 17 18 19 20 21 22 23 24 25 26 27 28 29 30 31 32 33 34 35 36 37 38 39 40 41 42 43 44 45 46 47 48 49 50 51 52 53 54 55 56 57 58 59 60 61 62 63 64 65 66 67 68 69 70 71 72 73 74 75 76 77 78 79 80 81 82 83 84 85 86 87 88 89 90 91 92 93 94 95 96 97 98 99 100 101 102 103 104 105 106 107 108 109 110 111 112 113 114 115 116 117 118 1.0 e10, false );__CFRunLoopFindMode (runloop, modeName, false );if (__CFRunLoopModeIsEmpty (currentMode)) return;__CFRunLoopDoObservers (runloop, currentMode, kCFRunLoopEntry);__CFRunLoopRun (runloop, currentMode, seconds, returnAfterSourceHandled) {0 ;do {__CFRunLoopDoObservers (runloop, currentMode, kCFRunLoopBeforeTimers);__CFRunLoopDoObservers (runloop, currentMode, kCFRunLoopBeforeSources);__CFRunLoopDoBlocks (runloop, currentMode);__CFRunLoopDoSources0 (runloop, currentMode, stopAfterHandle);__CFRunLoopDoBlocks (runloop, currentMode);if (__Source0DidDispatchPortLastTime ) {__CFRunLoopServiceMachPort (dispatchPort, &msg)if (hasMsg) goto handle_msg;if (!sourceHandledThisLoop) {__CFRunLoopDoObservers (runloop, currentMode, kCFRunLoopBeforeWaiting);__CFRunLoopServiceMachPort (waitSet, &msg, sizeof (msg_buffer), &livePort) {__CFRunLoopDoObservers (runloop, currentMode, kCFRunLoopAfterWaiting);if (msg_is_timer) {__CFRunLoopDoTimers (runloop, currentMode, mach_absolute_time())else if (msg_is_dispatch) {__CFRUNLOOP_IS_SERVICING_THE_MAIN_DISPATCH_QUEUE__ (msg);else {__CFRunLoopModeFindSourceForMachPort (runloop,__CFRunLoopDoSource1 (runloop, if (sourceHandledThisLoop) {__CFRunLoopDoBlocks (runloop, currentMode);if (sourceHandledThisLoop && stopAfterHandle) {else if (timeout) {else if (__CFRunLoopIsStopped (runloop)) {else if (__CFRunLoopModeIsEmpty (runloop, currentMode)) {while (retVal == 0 );__CFRunLoopDoObservers (rl, currentMode, kCFRunLoopExit);
可以看到,实际上 RunLoop 就是这样一个函数,其内部是一个do-while 循环。当你调用 CFRunLoopRun() 时,线程就会一直停留在这个循环里;直到超时或被手动停止,该函数才会返回。RunLoop 的核心是 mach_msg() 函数(见上面代码的第7步),RunLoop 调用这个函数去接收消息,如果没有别人发送 port 消息过来,内核会将线程置于等待状态。
6.Runloop对象 Runloop 对象提供了添加输入源、定时器、观察者以及启动 Runloop 的接口。每个线程都有唯一的与之关联的 Runloop对象。Cocoa和 CF 都有相应的接口可以操作 RunLoop:
Cocoa中对应的是 NSRunLoop;
CF 中对应的是 CFRunLoopRef;
1.获取RunLoop
这是 CF 框架提供的,它提供了纯C函数的API,这些API都是线程安全的。
1 CFRunLoopRef aCFRunloopObjRef = CFRunLoopGetCurrent()
这是Cocoa框架提供的,它提供了面向对象的 API,是基于CFRunLoopRef的一层封装,但这些API是非线程安全的;苹果官方文档说,我们不能在当前线程中去call另外一个线程中 NSRunLoop 对象的方法,那样很可能会造成意想不到的后果。
1 NSRunLoop *aRunloopObj = [NSRunLoop currentRunLoop]
不过,两种类型的 Runloop 可以混合使用。鉴于 CFRunLoopRef 是线程安全的,所以,可以通过 NSRunLoop 类的实例方法获取对应的 CFRunLoopRef 对象,进而达到线程安全的目的:
1 2 NSRunLoop *aRunloopObj = [NSRunLoop currentRunLoop]= [aRunloopObj getCFRunLoop]
2.启动RunLoop 1.NSRunLoop的启动 不建议使用,因为这个接口会导致Run Loop永久性的在NSDefaultRunLoopMode模式。即使用CFRunLoopStop()函数也无法停止Run Loop的运行,除非能移除这个runloop上的所有事件源,不然这个子线程就无法停止,只能永久运行下去。
1 - (void )runUntilDate:(NSDate *)limitDate;
比上面的接口好点,有个超时时间,可以控制每次 Runloop 的运行时间,也是运行在NSDefaultRunLoopMode模式。这个方法运行 Runloop 一段时间会退出给你检查运行条件的机会,如果需要可以再次运行 Runloop。
注意:使用这种方式启动runloop时,CFRunLoopStop()函数也无法停止这个runloop。
#示例:
1 2 3 4 5 6 7 8 BOOL finished = NO;while (!finished) {[[NSRunLoop currentRunLoop] runUntilDate: [NSDate dateWithTimeIntervalSinceNow: 1]] ;"exit runloop ......" );
这个finished是我们自定义的一个Bool值,用来控制是否还需要开启下一次 Runloop。
上面例子所做的事:while循环内部有个 RunLoop 每秒循环一次,Runloop 结束后会输出exit Runloop ……。while循环会根据 finished 值来判断是否再去运行 Runloop。
输出日志如下:
1 2 3 4 5 6 21 :20 :20.980211 +0800 exit runloop ......21 :20 :21.981915 +0800 exit runloop ......21 :20 :22.983668 +0800 exit runloop ......21 :20 :23.984748 +0800 exit runloop ......21 :20 :24.986541 +0800 exit runloop ......21 :20 :25.988267 +0800 exit runloop ......
1 - (BOOL )runMode:(NSRunLoopMode )mode beforeDate:(NSDate *)limitDate;
比上面的方法多了mode参数,不同的是,这种运行方式是可以被CFRunLoopStop()函数停止的。
2.CFRunLoopRef的启动 使用这种方式启动后,Runloop 会一直运行,直到显示地调用CFRunLoopStop()才会停止。另外,删除 RunLoop 的所有事件源后,也能停止这个 Runloop。
1 SInt32 CFRunLoopRunInMode(mode , second , returnAfterSourceHandled ) ;
参数mode:模式;
参数second:runloop的循环时间;
参数returnAfterSourceHandled:是否在处理事件后让Run Loop退出返回;
这种方式启动的 Runloop 也可以使用CFRunLoopStop()来主动停止。NSRunloop 中的第三种启动方式,实质上就是基于这种方式的封装,只不过指定了最后一个returnAfterSourceHandled参数为YES。
启动 Runloop 后,代码停在这一行不返回。当有值返回时Runloop就结束了。这个返回值就是Runloop结束原因,枚举如下:
1 2 3 4 5 6 7 /* Reasons for CFRunLoopRunInMode() to Return */ 1 , // Runloop结束,所有的Sources都已被移除,无事件源可监听;2 , // Runloop被使用CFRunLoopStop函数停止;3 , // 超时;4 // Runloop已处理完事件;
回头看看NSRunloop的第三种启动方式:
1 - (Bool) runMode:(NSString *) mode beforeDate:(NSDate *) limitDate;
返回值为一个Bool值,如果是”performSelector” 事件或者其他 Input Source 事件触发并处理完成后,Runloop会退出并返回YES,其他情况下返回NO。
3.退出RunLoop 上面也有提到,有三种方法可以让 Runloop 处理事件之前退出:
这可以使 Runloop 退出前完成所有正常操作,包括发送消息给 Runloop 观察者,如果可以配置的话,推荐使用这种方法。
这可以显式的停止 Runloop,Runloop 会把所有剩余的通知发送出去再退出。
尽管这种方式也可能导致 Runloop 退出,但这并不是可靠的退出 Runloop 的方法。一些系统例程会添加输入源到 Runloop 里面来处理所需事件。因为你的代码未必会考虑到这些输入源,这样可能导致你无法移除它们,从而导致退出 Runloop 失败。
7.应用场景 1.场景汇总
开启常驻线程时,需要在当前线程中启动 runloop,如AFN;
在子线程中使用定时器时,需要在子线程中启动 runloop,定时器才能正常启动;
创建定时器,在当前 runloop 的特定Mode下执行,如滑动时的定时器;
在特定Mode下执行任务,default模式下设置图片、加载缓存。
添加观察者,在 runloop 的特定时刻处理某些事情;
使用端口或自定义输入源来和其他线程通信;
2.其他应用 ibireme的这篇博客 里提到了一些具体的应用场景:
AutoreleasePool(监听通知以执行自动释放池的push与pop)
界面更新(beforeWaiting时更新界面)
事件响应(port->source1->source0)
手势识别
定时器
GCD
网络请求
3.卡顿检测 卡顿原理:
主线程runloop处于beforeSource或afterWaiting状态时表示正在执行任务;
设置一个卡顿时长阈值T,隔时长T检查一次当前runloop的状态(mode);
若多个检查周期中,一直处于以上两种状态,而没有休眠,则说明线程处于卡顿状态;
获取卡顿时堆栈的情况,记录并上报;
实现方案:
监听并记录主线程runloop的mode(状态);
开启一个常驻线程,处理检测、上报任务;
启动定时器,阈值T时间到后比对runloop的状态;
当阈值T时间内连续检测到状态为beforeSource或afterWaiting,即为卡顿,上报堆栈;
1 2 3 4 5 6 7 8 9 10 11 12 13 14 15 16 17 18 19 20 21 22 23 24 25 26 27 28 29 30 31 32 33 34 35 36 37 38 39 40 41 42 43 44 45 46 47 48 49 50 51 52 53 54 55 56 57 58 59 60 61 62 63 64 65 66 67 68 69 70 71 72 73 74 75 76 77 78 79 80 81 82 83 class RunLoopMonitor {private init () {}static let shared: RunLoopMonitor = RunLoopMonitor .init ()var loopObserver: CFRunLoopObserver ?var loopActivity: CFRunLoopActivity ?var aSemaphore: DispatchSemaphore ?var stuckTimes = 0 func startMonitor () {let uptr = Unmanaged .passRetained(self ).toOpaque()let vptr = UnsafeMutableRawPointer (uptr)var context = CFRunLoopObserverContext .init (version: 0 ,nil ,nil ,nil )= CFRunLoopObserverCreate (kCFAllocatorDefault,CFRunLoopActivity .allActivities.rawValue,true ,0 ,& context)CFRunLoopAddObserver (CFRunLoopGetMain (), loopObserver, .commonModes)= DispatchSemaphore .init (value: 0 )DispatchQueue .global().async {while true {let st = self .aSemaphore? .wait(timeout: DispatchTime .now() + .milliseconds(80 )) if st == .timedOut {guard self .loopObserver != nil else {self .aSemaphore = nil self .loopActivity = nil self .stuckTimes = 0 return if self .loopActivity == .afterWaiting || self .loopActivity == .beforeSourcesself .stuckTimes += 1 if self .stuckTimes < 3 { continue }DispatchQueue .global().async {private func observerCallBack () -> CFRunLoopObserverCallBack {return { (observer, activity, context) in let weakself = Unmanaged <RunLoopMonitor >.fromOpaque(context! ).takeUnretainedValue()= activity? .signal()func end () {guard let _ = loopObserver else { return }CFRunLoopRemoveObserver (CFRunLoopGetMain (), loopObserver, .commonModes)= nil
相关参考:
#©官方文档
#©ibireme
#©微信卡顿检测
#©百度孙源-优化UITableViewCell高度计算的那些事